Manufacturing Process (Assembly)
Once a Manufacturing Order (MO) is created, the company can start the production or assembly process based on that MO. The production process can involve creating products from scratch or assembling various components and parts. The production operator can refer to the Job Order document produced from the MO to then scan or input the transaction number and input the final result of each production stage that has been passed. The final result is related to the finished product, NG product, NG warehouse, the name of the responsible operator, and other important information.
Here are the general steps carried out in the production process based on the created Manufacturing Order:
- Preparation of material and resources. At this step, the company prepares the materials, components, and other resources needed to start the production process. The materials must be available in sufficient quantities, and their quality must meet the established standards. In common practice, the warehouse officer will transfer stock from the raw material area to the production area or machine area depending on the company's needs.
- Component processing. If the product being produced requires assembly from several components, these components must be processed first before being assembled. This processing could involve cutting, machining, welding, or other necessary processes.
- Product assembly. After the components are processed, the company can start the product assembly or assembly process based on the work sequence determined in the Manufacturing Order. At this stage, the operator will assemble the product using machines, tools, and other equipment needed.
- Quality inspection. After the product is assembled, it must be inspected to ensure its quality meets the established standards. The inspection can be done using measuring tools, functional tests, or other inspection processes.
- Production completion and delivery. Once the product passes the quality inspection, it is considered finished. Then, the product can be packed and prepared for delivery to customers or stored in the inventory warehouse.
In the SOFICloud ERP application, each step in the production process can be recorded and tracked well. This allows the company to optimize the production process, speed up production time, and overall increase production efficiency.
Setup
To record a Manufacturing Process transaction, select the Manufacturing menu and then click the Manufacturing Process menu. The system will display the Manufacturing Process menu as in image 7.4.1
Here are the steps to record a Manufacturing Process transaction:
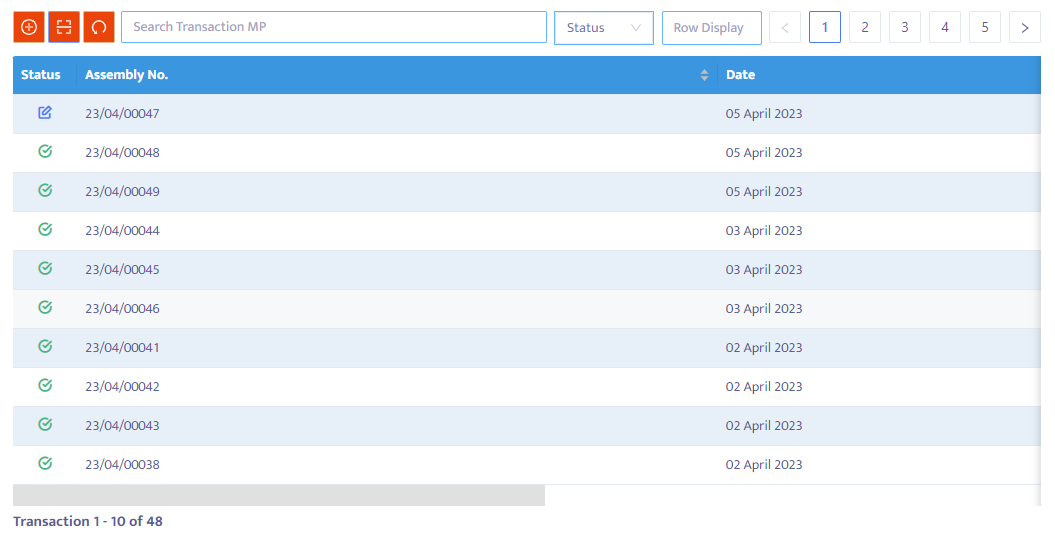
- Click the Manufacturing / Manufacturing Process menu. Next, the system will display a transaction list. Click the Entry With Scan button on the header of the transaction listing to perform the scanning process of the barcode / QR code of the Job Order document. See in image 7.4.2
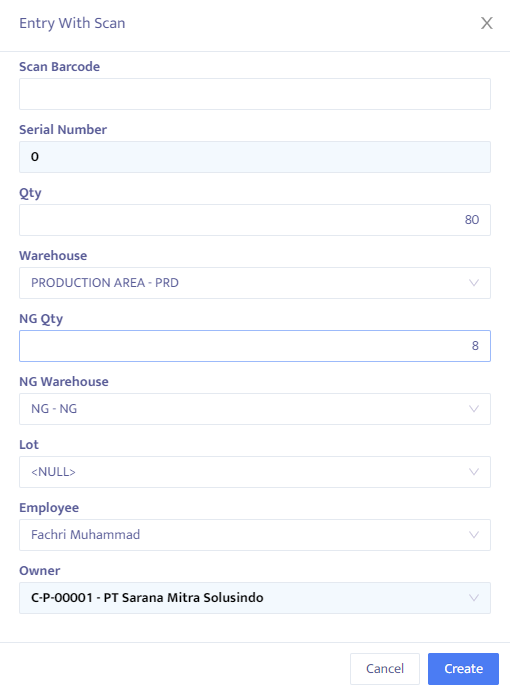
- The system will then display the Entry With Scan menu as in image 7.4.3. Complete the necessary data as follows:
- Point your pointer to the Scan Barcode column, then scan the Job Order document
- Serial Number, used for each production result that requires a serial number.
- In the Qty field, fill in the quantity of finished product results or WIP from that routing stage
- In the Warehouse combo box, the system will display the location or production area. Make sure there is enough raw material stock for this process, and the system will protect if the required stock is insufficient
- NG Qty and Warehouse, input the quantity of not good items and the location of the items
- In the Lot section, choose the lot number if needed
- In the Employee selection, choose the name of the production operator responsible for that production process
- The Owner column will display the owner of the consignment goods if the raw material product is a consignment item
- Click the Create button to complete the transaction.
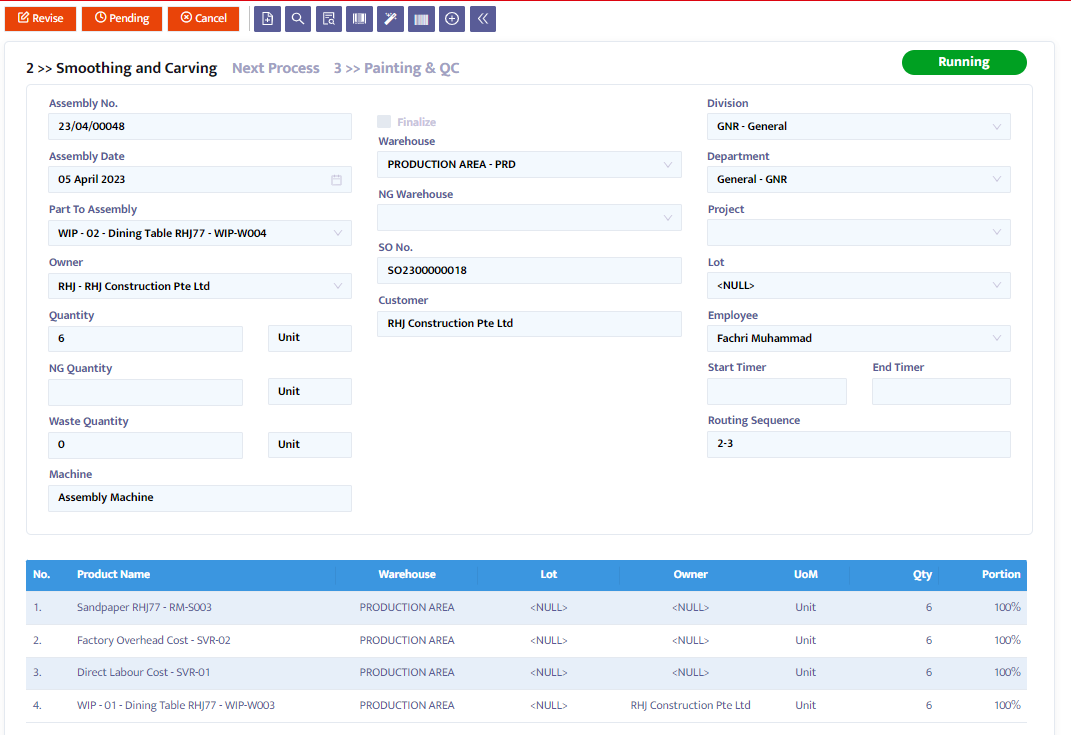
After completing the data, the system will automatically display the data that you have taken from the previous Manufacturing Order transaction.
- Assembly No, displays the transaction number automatically prepared by the system
- Assembly Date, displays the date the assembly process was carried out
- Part to Assembly, displays the name of the WIP or FG produced from the assembly process
- Owner, displays the name of the product owner
- Quantity, displays the qty result from the assembly process carried out
- NG Quantity, fill in the amount of NG goods produced
- Waste Quantity, fill in the amount of waste qty from the production results (damaged goods and no longer usable)
- Machine, displays the information of the machine used
- Warehouse, will display the location of the warehouse where the WIP or FG will be placed
- NG Warehouse, displays the location where NG is placed
- SO No, will automatically display the document number of the goods order
- Customer, displays the name of the customer who ordered the product
- Division, displays the related division
- Department, displays the related cost center department
- Project, displays the cost center project if needed
- Lot, choose the production lot number of WIP or FG if needed
- Employee, displays the name of the PIC responsible for the production process
- Start Time, fill in the information when the production started
- End Time, fill in the information when the production ended
- Routing Sequence, will automatically display the production sequence carried out against all stages that must be passed
- In the transaction detail section, the system will display detailed product or raw material information used. You can change the quantity of material if needed
Once finished, click the Save button at the top of the transaction to save the data
On the navigation button above the transaction, make the necessary transaction status changes. The options provided by the system are:
- Entry, still in the process of registering Manufacturing Process transaction data into the system. In this status, data can still be edited and deleted.
- Confirm, transaction data is confirmed to the system but has not been posted. In this status, data cannot be edited unless the Confirm status is first changed to the Revise status.
- Running, the transaction data is posted into the system. This status is run after the Confirm status, if you don't use the Running status then you won't be able to increase and decrease the stock in the warehouse. Similarly with the Confirm status, to edit the data of the Running status, it must first be changed to the Revise status.
- Revise, this status is used only to edit data but cannot delete/eliminate (all) transaction data on this form.
- Pending, the transaction form is temporarily closed with the intent of postponement. This status can still be opened to continue again.
- Cancel, the transaction form is canceled and cannot be reopened.
- Close, all transaction forms are closed and cannot be reopened.
Change the Entry status to Confirm, then Running to post the transaction.
To display the transaction document, click the Preview button.