Chart of Account
The chart of accounts or list of accounts is a complete list of financial accounts used by a company in their accounting system. The chart of accounts is an essential element in the accounting system that allows companies to track and record all financial transactions.
Each account in the chart of accounts is given a unique identification number or account code, and each account number is associated with a description that explains the type of financial transaction related to that account. The chart of accounts allows companies to group financial transactions into specific categories, such as assets, liabilities, equity, revenue, expenses, and others. Each of these categories can have many specific accounts under them.
Examples of some account numbers in the chart of accounts are: 1000 - Current Assets 2000 - Current Liabilities 3000 - Equity 4000 - Revenue 5000 - Operating Expenses
The chart of accounts can be customized according to the company's needs and can be changed as the company's needs change. The chart of accounts can also be used to generate financial statements such as income statements and balance sheets, as well as to facilitate financial analysis and better business decision-making.
Setup
To design your own or edit existing account codes, direct your pointer to the Static Data / General Ledger Menu / Chart of Account submenu and click, you will get the menu as shown in Figure 3.3.2
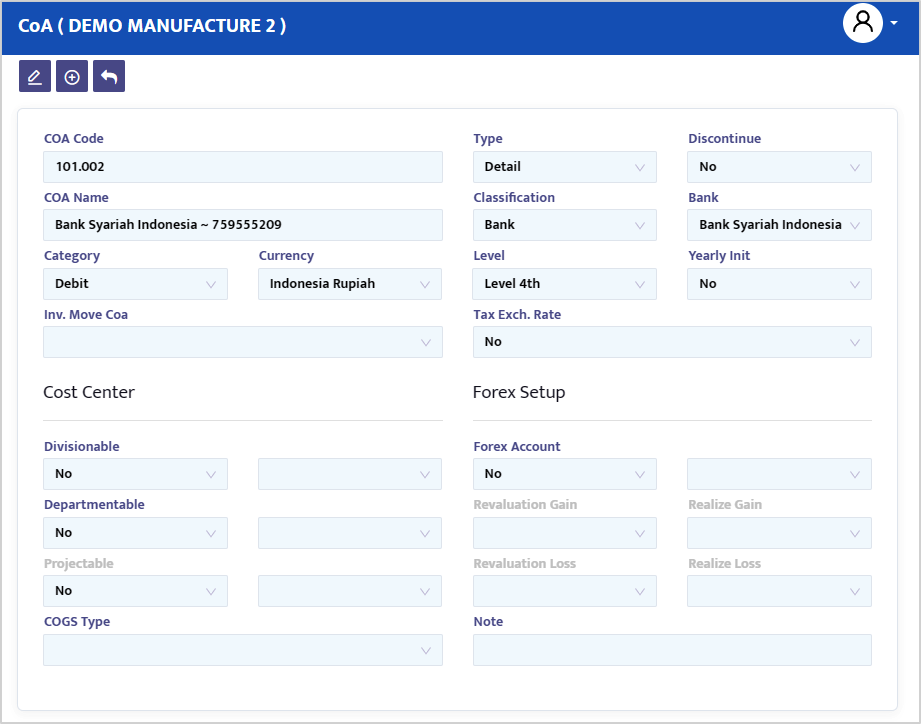
- In the Code field, type the Account Code or Account Number for an account you want to register.
- In the Type combo box, select the Total account type if the account is a parent account or an Unposting Account where the account only holds the total of detail accounts one level below it; or select Detail if the account is used to hold transaction values or is a Posting Account.
- In the Name field, type the account name to be registered.
- In the Classification combo box, select the classification of the registered account, for example, the Building account is classified as Fixed Asset. Certain account classifications can automatically activate or deactivate the following combo box.
- In the Bank combo box, used only when registering a bank account. The bank names entered in the Static Data menu will be displayed in this combo box.
- In the Category combo box, select whether the account has a normal balance in debit or credit.
- In the Currency combo box, select the account's currency.
- In the Level combo box, select the level or tier of the account. Level here is the systematic order of the highest to the lowest accounts, usually total-type accounts have a higher level than detail-type accounts. For more details, please see the example of Account Code Structure at the end of this Chart of Account discussion.
- In the COGS CoA combo box, select the account's CoA. This combo box is active when we choose the Inventory/Stock account. If our inventory method is periodic, the COGS CoA combo box changes to Inv. Movement CoA.
- In the Yearly Init combo box, select "True" to activate the account as a nominal or profit and loss account, where every end-of-month process all accounts with the Yearly Init status will have their debit and credit differences calculated and moved to the Current Earnings account. At the end of the fiscal year, this Current Earnings will be moved to Retained Earnings; select "False" if the account is not a Nominal account.
- In the Tax Exchange Rate combo box, select "True" if you are using Tax Rate; if not, select "False". This account is active when we choose a sales account.
- In the Divisionable combo box, select "True" if you want to allocate transaction values per division in the transactions you register and select the division name in the combo box next to it; select "False" if not.
- In the Departmentable combo box, select "True" if you want to allocate transaction values per department in the transactions you register and select the department name in the combo box next to it; select "False" if not.
- In the Projectable combo box, select "True" if you want to allocate transaction values per project in the transactions you register and select the project name in the combo box next to it; select "False" if not.
- In the Forex Revaluation combo box, select "True" if you want to activate the exchange rate difference calculation on the account you register and select the account to accommodate the exchange rate difference in the combo box next to it. Accounts that typically require exchange rate difference calculations are cash/bank accounts, accounts payable and receivable, and inventory accounts; select "False" if not.
- In the Note field, you can enter any necessary notes.
- Press the Save button to save the data you have created.