Purchase Order
A Purchase Order (PO) is a document that contains a summary of goods ordered from a supplier. This document also serves as an official contract that contains an agreement on the goods the buyer wants from the supplier. The PO document will of course contain complete information related to the purchase terms and the specifications of the goods to be purchased.
Soficloud complements the PO transaction with a monitoring feature for Request (PR) documents as well as for Goods Receipt (GRN) documents, so the order progress information is presented in real-time. Equipped with an automatic numbering format and also the addition of the PO Document Type, it makes transaction analysis sharper and more accurate. You can also create various PO designs according to transaction needs and add extended fields for other important additional information.
Setup
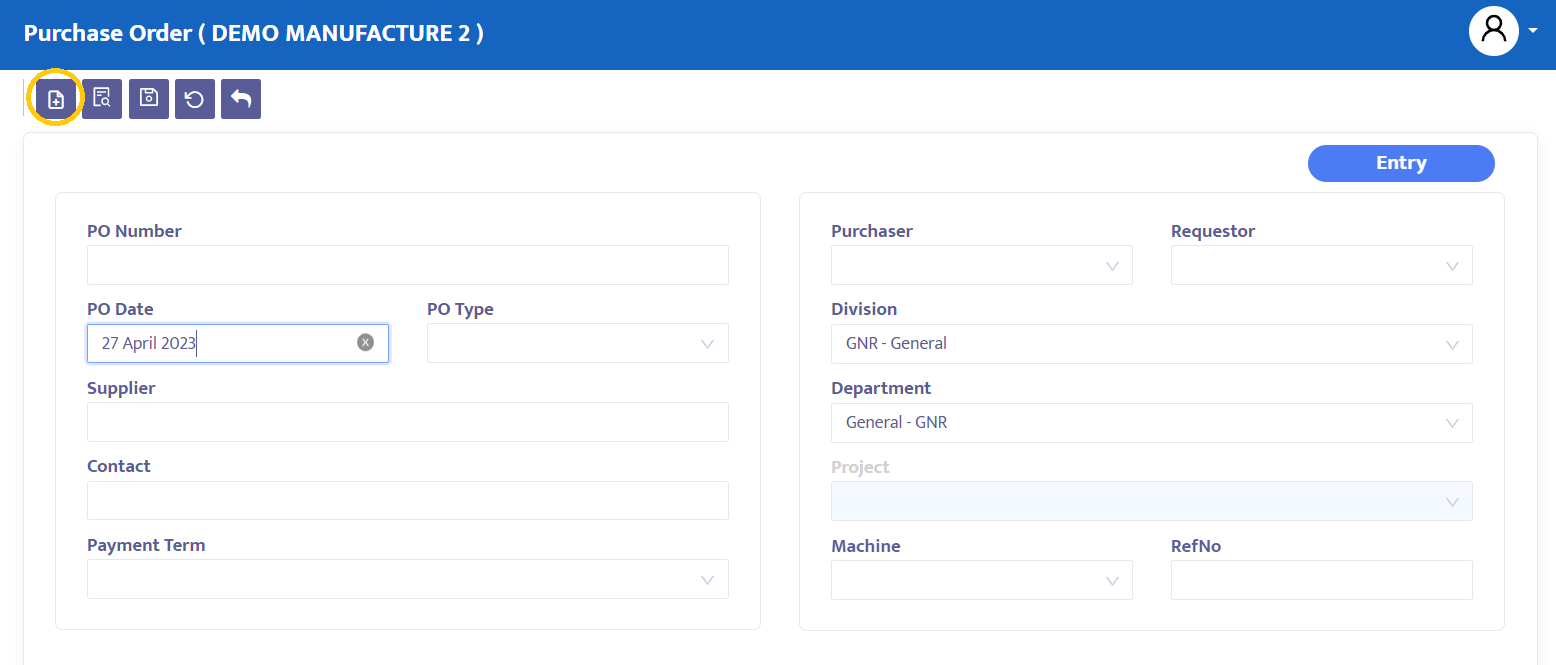
To record the Purchase Order transaction, select the Procurement menu then click the Purchase Order menu. The system will display the PR transaction menu as shown in figure 5.1.2
Here are the steps to complete the Purchase Order transaction:
- Click the Add Item button on the Purchase Order transaction that you have opened. See in figure 5.1.2a below:
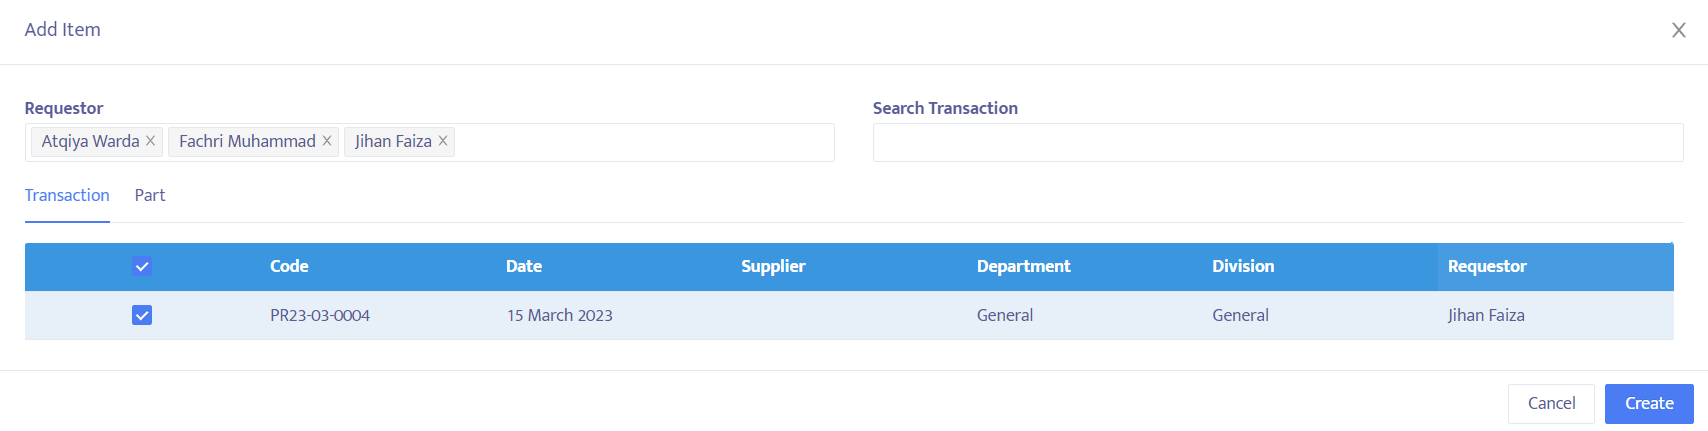
- Next, the system will display the add item form as shown in figure 5.1.2b. Carry out the selection of PR and Supplier data that will be continued to the PO transaction you need. Automatically, the system will transfer all information on ordered products into the Purchase Order transaction. Delete products or edit qty if needed. Click the Create button to create the PO transaction.
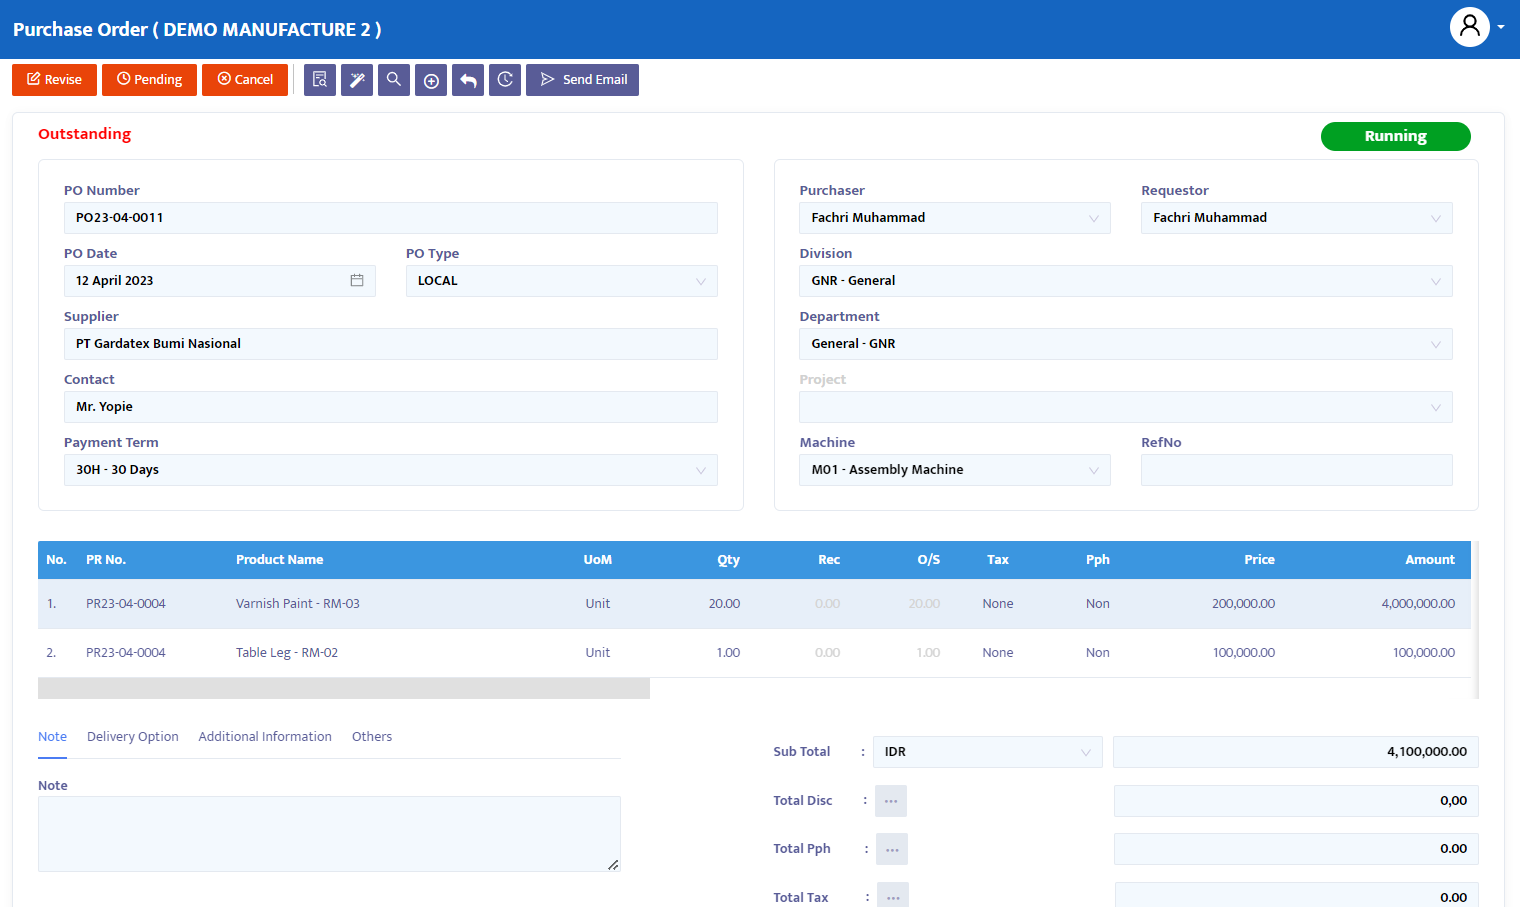
After the Add Item process from the PR transaction, the system will then display the Purchase Order transaction form that has contained information from the PR that has been selected previously.
Recheck to ensure the accuracy of the data. The following is a detailed explanation of the information on the Purchase Order transaction:
- In the PO No field, the system will automatically provide numbering, but you can still edit it according to company interests or standards.
- In the Date field, the system will provide the same date as the date on your computer when this form is opened. But you can edit the date of this Purchase Order form as needed.
- In the PO Type combo box, select the type of Purchase Order required. You can define your own type or kind of PO needed by the company.
- In the Supplier combo box, the system will display the name of the supplier that you have previously selected. You can make changes if necessary.
- In the Contact field, type the name of the person (contact person) from the supplier company who is responsible for the submitted Purchase Order document.
- In the Payment Term combo box, select the payment term of the relevant PO. By default, the system will display the payment term of the selected supplier that has been previously completed related to its payment term information.
- In the Purchaser combo box, select the name of the purchasing officer related to the issuance of the document.
- In the Division combo box, select the division related to this order if your company allocates per division.
- In the Department combo box, select the department name related to this order if your company allocates per department.
- In the Project combo box, select the project related to the concerned request transaction.
- In the Machine combo box, include the machine name if the order is related to a particular machine's needs. Ignore if not related.
- In the Ref No field, type reference number information if needed.
After completing the data, the system will automatically display the product that you have taken from the previous PR transaction.
- Product, contains information about the selected product name.
- Quantity, contains the quantity of products you want to order. Make changes if necessary.
- Rec Qty, will inform you of the Qty amount of the relevant product that has been received.
- O/S GRN, shows how much qty of goods is still not received.
- Tax, by default will display tax data that will be charged on transactions according to the setup that has been determined on the relevant product in the master part.
- PPh, like the above PPN Tax, the system will also activate PPh deductions if the relevant product is subject to certain PPh rates.
- Price, contains information about the price of the relevant product. Perform entry or price editing if necessary.
- Amount, displays total qty x price.
- Req Date, contains information about the date the relevant product is needed.
- CoA, contains information about the account to be debited from the relevant product.
- Note, create more detailed and specific notes in the Note facility for each product you order.
Once finished, click the Save button at the top of the transaction to save the data.
On the navigation button above the transaction, change the transaction status as needed. The choices provided by the system are:
- Entry, still in the process of registering PR form transaction data into the system. At this status, data can still be edited and deleted.
- Confirm, transaction data is confirmed to the system but has not been posted. In this status, data cannot be edited unless the Confirm status is first changed to the Revise status.
- Running, transaction data is posted into the system. This status is executed after the Confirm status, if you do not use the Running status then you will not be able to proceed to the next form (in this case the GRN form). Similarly, with the Confirm status, to edit Running status data, it must first be changed to Revise status.
- Revise, this status is used only to edit data but cannot delete/eliminate (all) transaction data on this form.
- Pending, the transaction form is temporarily closed for the purpose of delay. This status can still be opened to continue. If from that PO form you have continued to open the GRN form, and Supplier Invoice and you give the Pending status to the PO form, then the GRN/Receive Invoice/Payment transaction form will also be postponed.
- Cancel, the transaction form is canceled and cannot be reopened.
- Close, all transaction forms are closed and cannot be reopened.
Change the Entry status to Confirm, then Running to post this transaction and use the wizard facility if you want to proceed to the next form, but you can also use the manual method (add item) in the next transaction, in this case, Goods Receipt Note.
To display transaction documents, click the Preview button.
Click Send Email if needed to send the document to the supplier's email address.