Sales Quotation (SQ)
A Sales Quotation is a document containing information about the products or services offered by a company to potential customers. It is part of the sales process and is usually issued in the early stages, before the customer makes a purchase.
In the SOFICloud ERP application, a Sales Quotation can be created through the Sales module and then the Price Offer (Sales Quotation) module. It contains information about the products or services offered, quantity, price, and delivery time. Additionally, the Sales Quotation in the SOFICloud ERP application can also include other information that can help customers make purchasing decisions, such as discounts or special offers.
One advantage of using Sales Quotations in the SOFICloud ERP application is the ease of creation and management. Sales Quotations can be generated automatically through the ERP system and accessed by the entire sales or marketing team of the company. This makes it easier for the sales team to provide consistent and accurate information to potential customers.
Furthermore, Sales Quotations in the SOFICloud ERP application can be integrated with other modules such as inventory and production, making it easier for the company to manage the inventory or production needed to fulfill orders received from Sales Quotations. With Sales Quotations in the ERP application, companies can also monitor and analyze their sales performance better, making it easier for them to make strategic decisions to increase sales and profits.
Setup
To record a Sales Quotation transaction, select Sales from the menu and then click on Sales Quotation. The system will display the SQ transaction menu as shown in Figure 5.1.
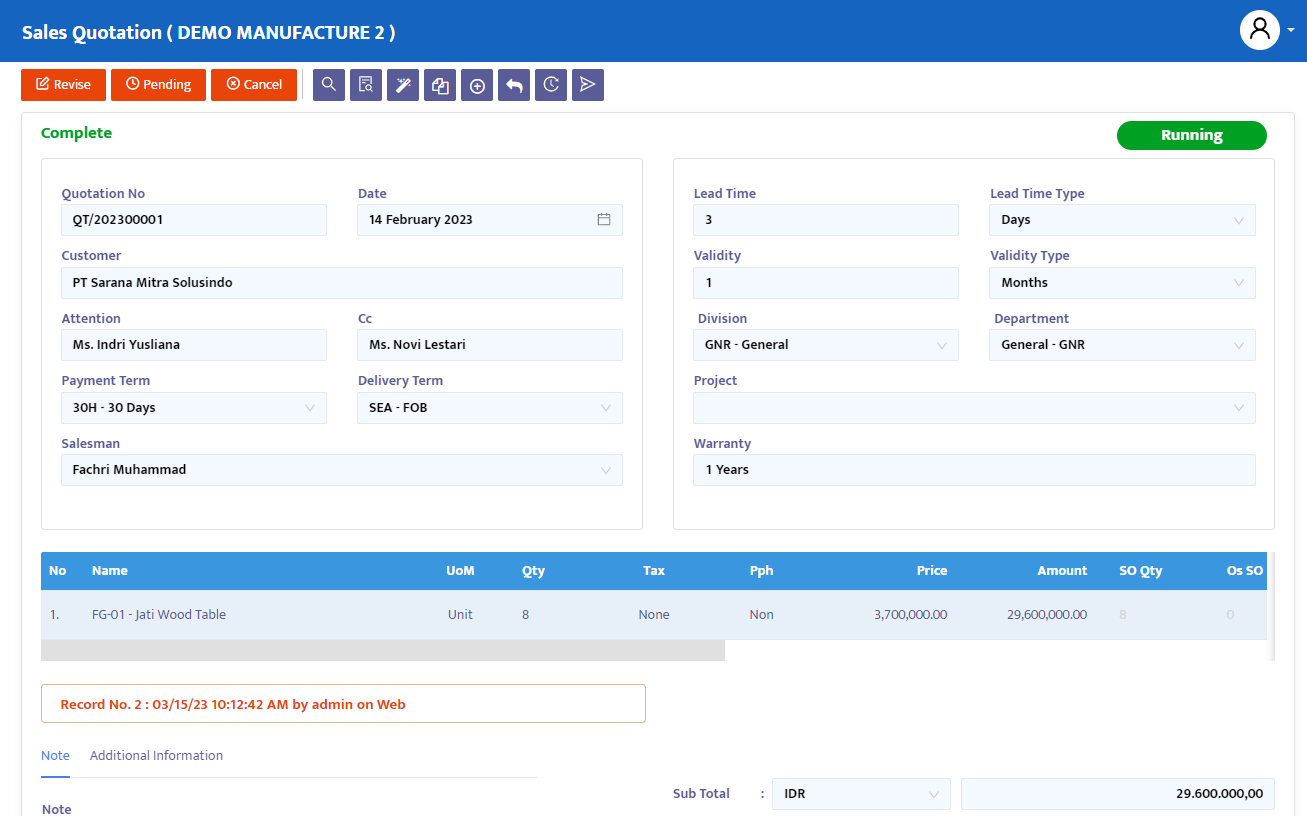
The following are the steps to complete a Sales Quotation transaction:
In the Quotation No field, the system will automatically assign a number, but you can still edit it according to your needs or company standards.
In the Date field, the system will provide the same date as the date on your computer when this form is opened. However, you can edit the date of this Sales Quotation form as needed.
In the Customer combo box, select the customer name to be targeted for the transaction issuance.
In the Attention field, the system will display the name of the pic personnel from the respective customer as already completed in the customer master. Update changes if needed.
In the CC field, the system will display the names of other pic personnel from the respective customer as already completed in the customer master. Update changes if needed.
In the Payment Term combo box, enter the payment terms. If already completed in the customer master, the system will display the default value.
In the Delivery Term combo box, the system will also display the delivery terms as already completed in the customer master. Change if needed.
In the Salesman combo box, select the name of the related marketing PIC for the transaction.
In the Lead Time field, enter information about the guaranteed delivery time of the offered products or services.
In the Validity field, enter information about the validity period of this price quotation.
In the Division combo box, select the division related to this price quotation if your company allocates by division.
In the Department combo box, select the related department name for this price quotation if your company allocates by department.
In the Project combo box, select the project related to the transaction offer.
In the Warranty field, enter information about the offered product warranty.
After completing the data, the system will automatically display the product selection column. Fill in the product according to your needs:
- Product, search for the product name or code from the list of products that you have previously registered.
- Quantity, fill in the quantity of the product you want to order.
- Price, is optional. Fill in if needed, and leave it blank if not needed.
- Click Add Product when finished. The system will then insert the product you have chosen into the transaction details.
- Re-select for other products that you need, then click the Add Product button to add them to the transaction detail list.
In the transaction details section, there are some additional pieces of information that you need to understand as follows:
- Tax, by default, will display the tax data that will be charged on the transaction according to the setup that has been determined on the product in question in the master part.
After completion, click the Save button at the top of the transaction to save the data.
On the navigation button above the transaction, make the necessary transaction status changes. The options provided by the system are:
- Entry, still in the process of registering transaction data from the SQ form into the system. At this status, data can still be edited and deleted.
- Confirm, transaction data is confirmed to the system but not yet posted. In this status, data cannot be edited unless the Confirm status is first changed to Revise status.
- Running, transaction data is posted into the system. This status is run after the Confirm status, if you are not using the Running status then you will not be able to proceed to the next form (in this case the SO form). Just like with Confirm status, to edit data the Running status first needs to be changed to Revise status.
- Revise, this status is used only for editing data but cannot delete / remove (all) transaction data on this form.
- Pending, the transaction form is temporarily closed with the intention of delaying. This status can still be reopened to be continued. If from the SQ form you have continued to open the SO, DO, and Invoice form and you give Pending status on the SQ form, then the SO, DO / Invoice / Receipt transaction form will also be postponed.
- Cancel, the transaction form is canceled and cannot be reopened.
- Close, all transaction forms are closed and cannot be reopened.
Change Entry status to Confirm, then Running to post this transaction and use the wizard facility if you want to proceed to the next form, but you can also use the manual way (add item) on the next transaction in this case Sales Order.
To display transaction documents, click the Preview button.
Send Email Sales Quotation directly from the transaction if needed.