Sales Order
A Sales Order (Sales Purchase Order) is a document issued by the seller after receiving the Purchase Order from the party intending to buy goods (Customer). The Sales Order document contains details about the goods to be sold, quantity, selling price, and all terms that have been agreed upon with the buyer.
From the company's Internal Control System perspective, this document also serves as a monitoring tool for the goods delivery process and the invoices that have been and will be issued. If partial delivery of goods occurs, the system will detail the amount of goods that have been shipped and those that still have an outstanding status.
With the assistance of the SOFICloud ERP system, potential human errors that could occur can be minimized. Delivery of a lesser quantity, excess, or unknown delivery document status can be solved with the help of the system.
Setup
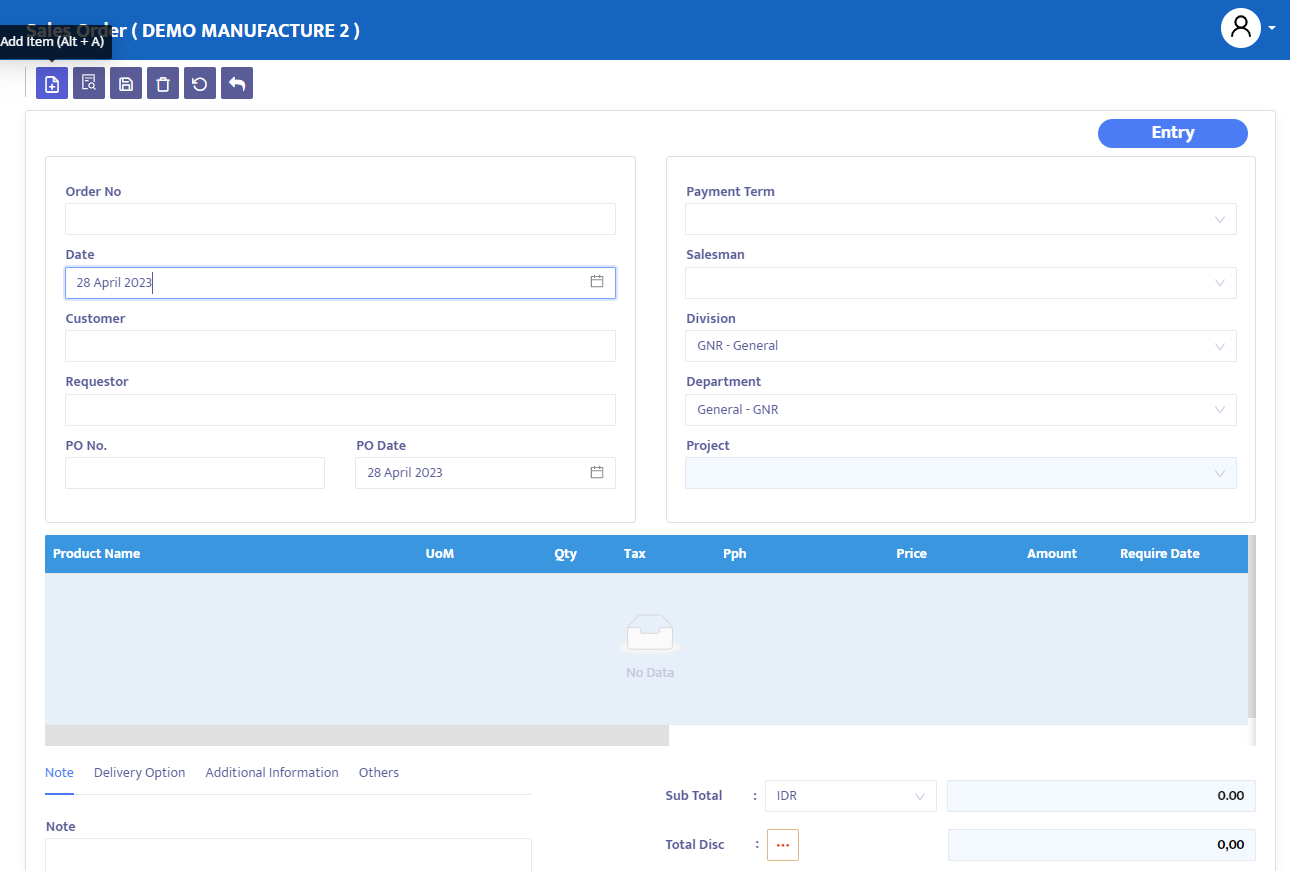
To record a Sales Order transaction, select the Sales menu and then click the Sales Order menu. The system will display the SO transaction menu as shown in picture 5.2
Here are the steps to complete the Sales Order transaction:
- Click the Add Item button on the Sales Order transaction that you have opened. See picture 5.2a
- Next, the system will display an add item form as shown in picture 5.2b. Select the Sales Quotation data and Customer to continue to the SO transaction you need. Automatically, the system will move all ordered product information into the Sales Order transaction. Delete the product or edit the quantity if needed. Click the Create button to make an SO transaction.

After performing the Add Item process from the SQ transaction, the system will display the Sales Order transaction form that already contains information from the selected SQ.
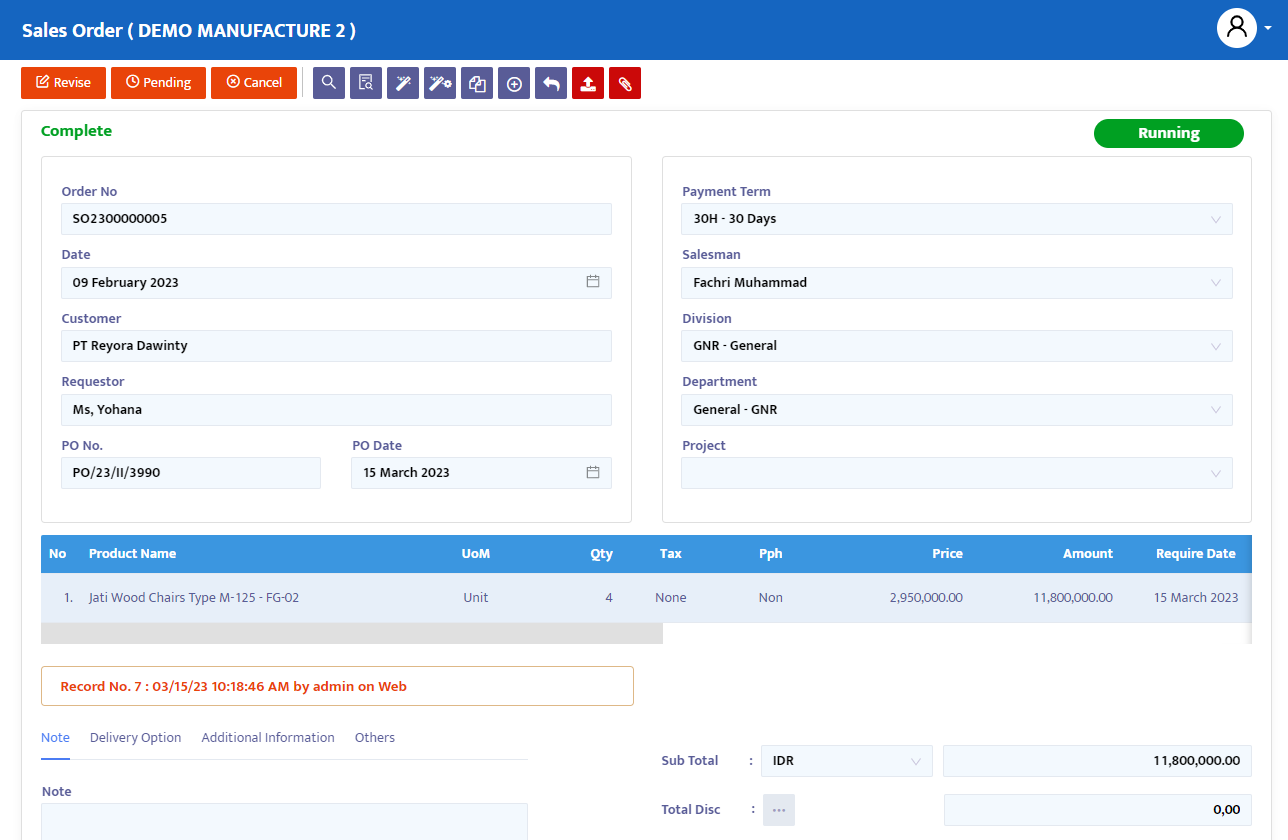
Check again to ensure the data is correct. Here are detailed explanations about the information on the Sales Order transaction:
- In the Order No field, the system will automatically give a numbering but you can still edit it according to the needs or standards of the company.
- In the Date field, the system will give a date that is the same as the date on your computer when this form was opened. But you can edit the date on this Sales Order form as needed.
- In the Customer combo box, the system will display the name of the customer you selected earlier. You can make changes if necessary.
- In the Requestor field, type the name of the person (contact person) from the customer's company related to the submitted Sales Order document.
- In the Payment Term combo box, select the payment terms of the related PO. By default, the system will display the payment term of the chosen supplier who has previously filled in his payment term information.
- In the PO No field, type the customer's PO document number
- In the PO Date field, type the PO document date
- In the Payment Term combo box, select the payment term
- In the Salesman combo box, select the PIC marketing from the related transaction
- In the Division combo box, select the division related to this order if your company allocates per division.
- In the Department combo box, select the name of the department related to this order if your company allocates per department.
- In the combo box "Project", select the project related to the transaction at hand.
After filling out these data, the system will automatically display the product that you have taken from the previous PR transaction.
- "Product" contains the name of the selected product
- "Quantity" contains the quantity of the product you wish to order. Make changes if necessary
- "Tax" will, by default, display the tax data that will be applied to the transaction as set up on the product in question in the master part
- "PPh", like the above Tax PPN, the system will also activate a PPh deduction if the product in question is subject to a certain PPh rate
- "Price" contains the price information of the product in question. Enter or edit the price if necessary
- "Amount" displays the total qty x price
- "Req Date" contains the date when the product in question is needed
- "CoA" contains information about the sales account that will be credited from the product in question
- "Note", make more detailed and specific notes on the Note facility on each product you order.
Once finished, click the "Save" button at the top of the transaction to save the data
On the navigation button above the transaction, make the necessary transaction status changes. The options provided by the system are:
- "Entry", still in the process of registering transaction data from SO form into the system. At this status, data can still be edited and deleted.
- "Confirm", transaction data is confirmed to the system but not yet posted. At this status, data cannot be edited unless the "Confirm" status is first changed to "Revise" status.
- "Running", transaction data is posted into the system. This status is run after "Confirm" status, if you do not use "Running" status then you will not be able to proceed to the next form (in this case DO form). Similarly, with "Confirm" status, to edit data "Running" status must first be changed to "Revise" status
- "Revise", this status is used only to edit data but cannot delete/eliminate (all) transaction data on this form.
- "Pending", the transaction form is temporarily closed with the intention of postponing. This status can still be opened to be resumed. If you have continued from this SO form to open DO, Invoice form and you give "Pending" status to this SO form, then the DO/Invoice/Receipt transaction form will also be postponed (postpone).
- "Cancel", the transaction form is cancelled and cannot be reopened.
- "Close", all transaction forms are closed and cannot be reopened.
Change the "Entry" status to "Confirm", then "Running" to post this transaction and use the wizard feature if you want to proceed to the next form, but you can also use the manual way (add item) on the next transaction in this case Delivery Order
To display the transaction document, click the "Preview" button