Inbound Transaction (Packing List Incoming)
Inbound instruction transactions are instructions or commands given to relevant parties in a business to prepare or send incoming goods to a warehouse or other storage facilities. These instructions serve to optimize the process of receiving incoming goods and ensure that these goods arrive on time, in good condition, and according to the expected specifications. Examples of inbound instruction in a business context can include:
- Instructions for shipping goods from the supplier to the company's warehouse.
- Instructions to organize and prepare newly arrived goods at the warehouse.
- Instructions to check the quality and quantity of incoming goods before they are received in the warehouse.
- Instructions to check and compare orders with invoices or other shipping documents.
In the SOFICloud ERP application, inbound instruction transactions (Packing List Incoming) are linked with the goods receipt module, which allows the warehouse and goods receipt departments to manage and track all instructions and activities related to receiving goods. With inbound instruction transactions, companies can ensure that the goods receipt process runs smoothly and efficiently, and allows related departments to coordinate and communicate more effectively.
Setup
To record the Inbound Instruction (Packing List Incoming) transaction, select the Inventory menu, then click the Packing List Incoming menu. The system will display the transaction menu as shown in image 6.1.
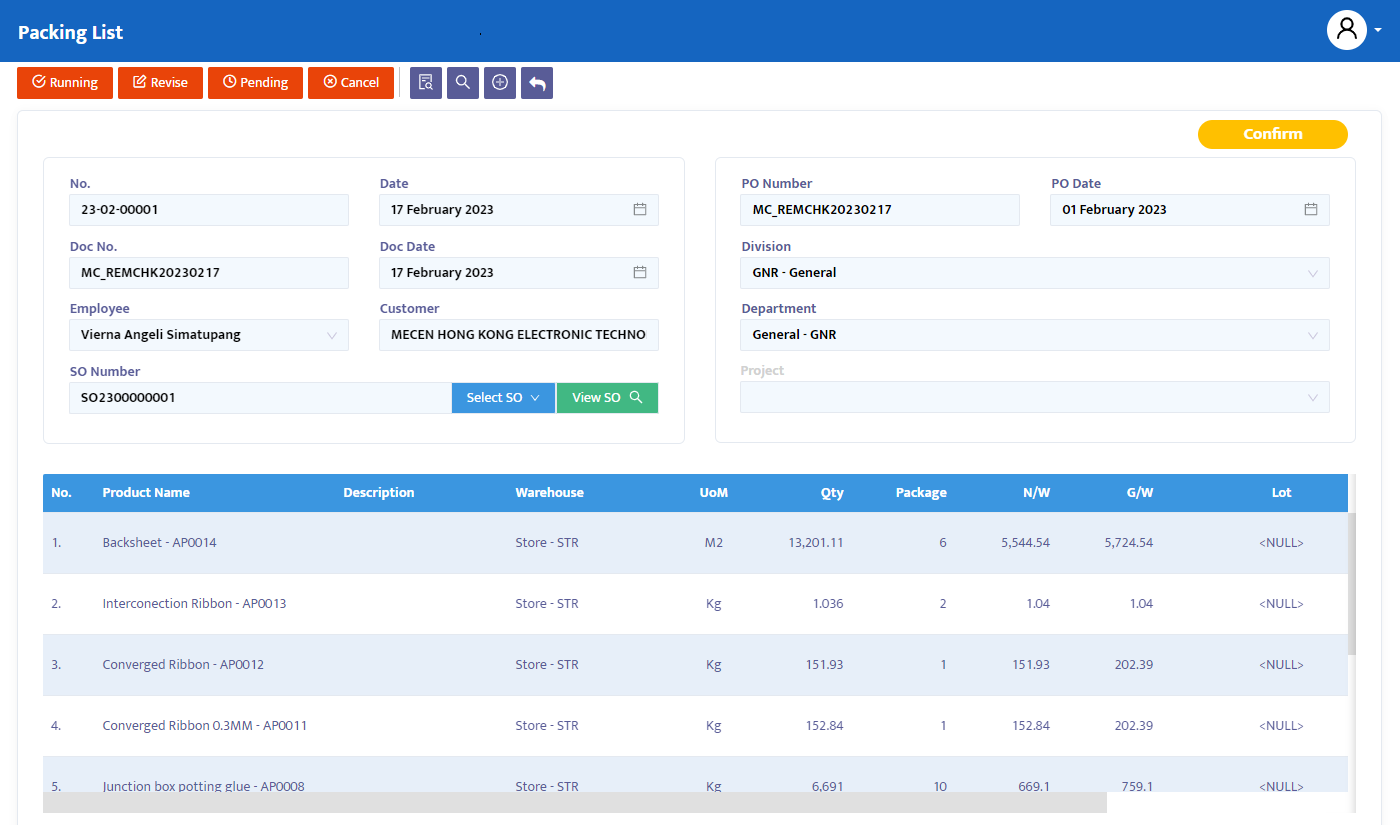
Here are the steps to complete the Packing List transaction:
In the No field, the system will automatically assign a number, but you can still edit it according to the company's needs or standards.
In the Date field, the system will provide a date that matches the date on your computer when this form is opened. However, you can edit the date of this transaction form as needed.
In the Doc No field, type the packing list document number as a transaction reference.
In the Doc Date field, type the document date.
In the Employee combo box, select the name of the person in charge who is recording the transaction.
In the Customer combo box, select the name of the customer who is shipping the goods.
In the SO Number column, click Select SO to choose the Sales Order transaction reference that forms the basis for the execution of the relevant product order. The system will monitor the target execution and the quantity of product produced from the received order.
In the PO Number and PO Date columns, the system will automatically display these numbers based on the selected SO transaction.
In the Requestor combo box, select the name of your employee who needs the order.
In the Division combo box, select the division responsible for this transaction if your company allocates by division.
In the Department combo box, select the name of the department related to this order if your company allocates by department.
In the Project combo box, select the project related to the relevant request transaction.
After completing the above data, the system will automatically display the product filling option column. Fill in the product according to your needs:
- Product, search the product name or code from the list of products that you have previously registered.
- Part (Finished Goods) Reference, select the reference name of the finished goods from the received order.
- Warehouse, select the warehouse location (storage) of goods when received at the company.
- Quantity, type the quantity of goods received.
- Click Add Product after completion. The system will then enter the product you have chosen into the transaction detail.
- Make another selection for any other product you need, then click the Add Product button to add it to the transaction detail list.
- Repeat the selection for any other product you need, then click the Add Product button to add it to the transaction detail list.
In the transaction detail section, there are some additional pieces of information that you need to understand as follows:
- Description, type additional information about the product according to the received packing list.
- Package, enter the number of packages received.
- N/W [Net Weight], fill in the net weight of the goods to be received.
- G/W [Gross Weight], fill in the gross weight of the goods to be received.
- Lot, enter the lot number if lot control of goods is needed. Ignore if not needed.
- Product Reference, will contain information about the name of the finished product to be produced according to the order.
Once completed, click the Save button at the top of the transaction to save the data.
On the navigation button above the transaction, make the necessary transaction status changes. The options provided by the system are:
- Entry, still in the process of registering PL form transaction data into the system. In this status, data can still be edited and deleted.
- Confirm, transaction data is confirmed to the system but has not been posted yet. In this status, data cannot be edited unless the Confirm status is first changed to the Revise status.
- Running, transaction data is posted into the system. This status is run after the Confirm status, if you do not use the Running status then you will not be able to proceed to the next form (in this case the Stock Receipt form). Similarly, to the Confirm status, to edit Running status data, it must first be changed to the Revise status.
- Revise, this status is used only to edit data but cannot delete/eliminate (all) transaction data on this form.
- Pending, the transaction form is temporarily closed for the purpose of postponement. This status can still be opened to be continued.
- Cancel, the transaction form is canceled and cannot be reopened.
- Close, all transaction forms are closed and cannot be reopened.
Change the Entry status to Confirm, then to Running to post the transaction.
To display the transaction document, click the Preview button.