Stock Receipt
Stock receipt, or receipt of stock, is the process of receiving and recording goods or raw materials that come into a company's warehouse or storage facility. Stock receipt is usually closely related to inbound instruction, where instructions are given to relevant parties to prepare and send incoming goods.
In the SOFICloud ERP application, stock receipt is a transaction related to the goods receipt module and can be integrated with the inbound instruction transaction. When an inbound instruction (incoming packing list) is received, the goods receipt module can generate a stock receipt, which records all necessary information to properly receive incoming goods, such as information about the quantity of goods, specifications of goods, delivery date, and supplier information.
Stock receipt in the SOFICloud ERP application allows the company to manage and track all received incoming goods, so the company can ensure that these goods are received correctly and in good condition. In addition, stock receipt also allows the company to manage inventory more efficiently because inventory information can be automatically updated when incoming goods are received.
Overall, stock receipt is very important in inventory management and receiving incoming goods. By using this feature, the company can ensure that incoming goods are received correctly and efficiently, and allows the company to better manage inventory.
Setup
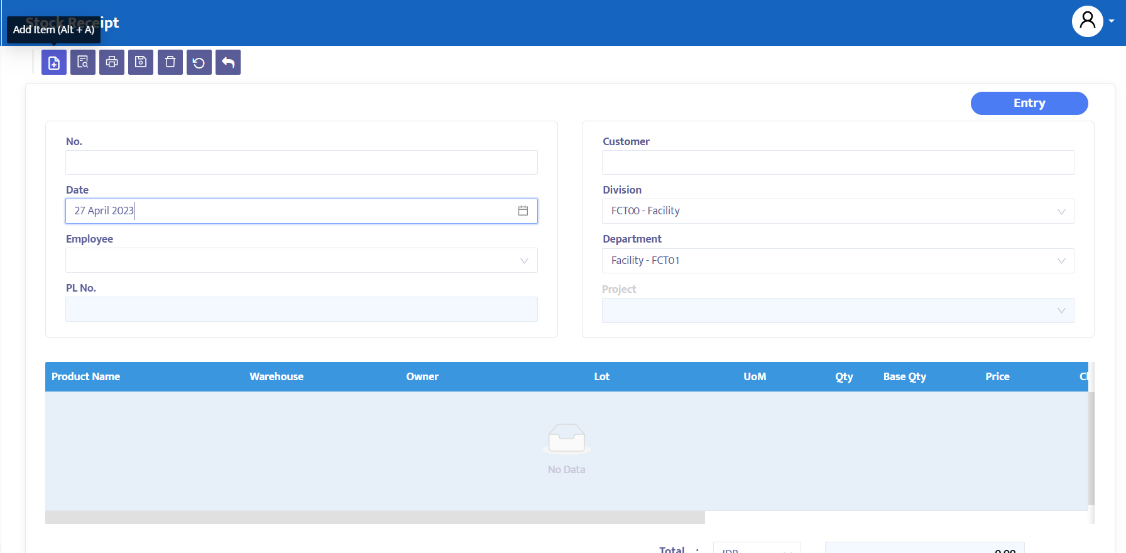
To record a Stock Receipt transaction, select the Inventory menu and then click on the Stock Receipt menu. The system will display this transaction menu as shown in figure 6.2
Here are the steps to complete a Stock Receipt transaction:
- Click the Add Item button on the Purchase Order transaction that you have opened. See the following figure 6.2:

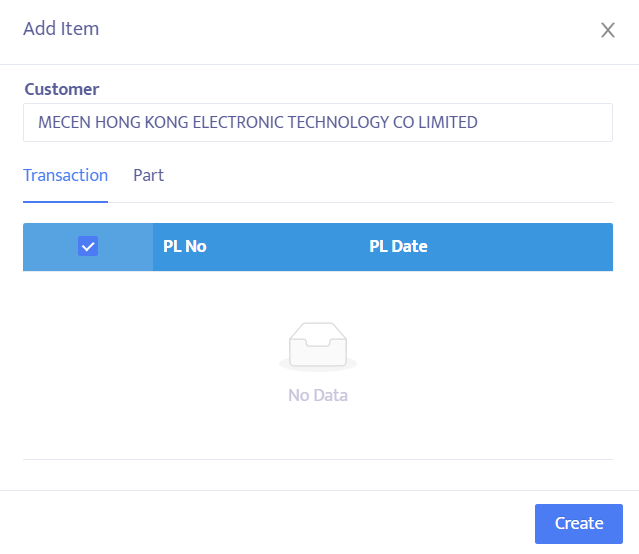
- Then, the system will display the add item form as shown in figure 6.2a. Select the Customer data to proceed to the Stock Receipt transaction that you need. Automatically, the system will move all product information to be shipped into the Stock Receipt transaction. Delete the product or edit the quantity if needed. Click the Create button to create a Stock Receipt transaction

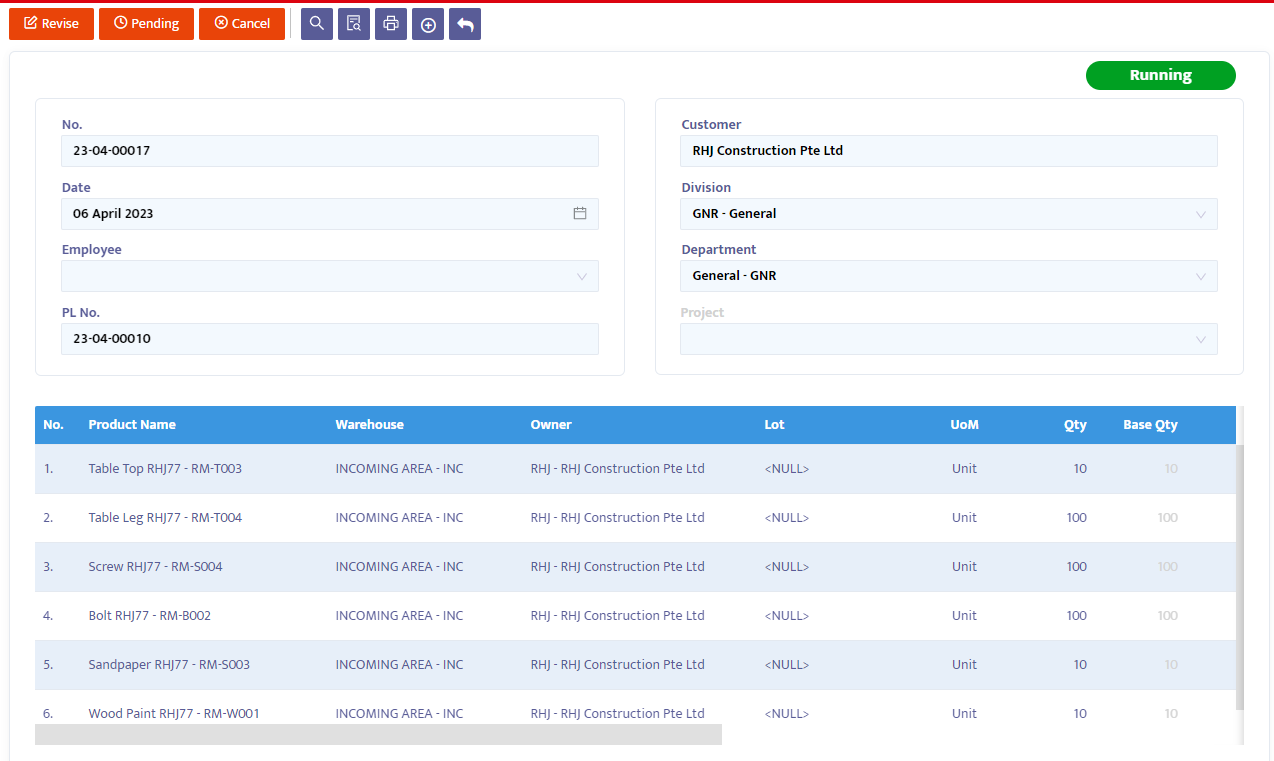
- After completing the Add Item process from the PL transaction, the system will display the Stock Receipt transaction form that already contains information from the selected PL
- Recheck to ensure the correctness of the data. Here is a detailed explanation of the information on the Stock Receipt transaction:
- In the No field, the system will automatically provide numbering, but you can still edit it according to company interests or standards.
- In the Date field, the system will provide a date the same as the date on your computer when this form is opened. You can edit the date of this Stock Receipt form as needed by the company
- In the Employee field, select the name of the person (contact person) from the company responsible for the received Stock Receipt document
- In the P/L No column, the system will display the reference number of the relevant Packing List
- In the Customer combo box, the system will display the customer's name according to the received packing list document
- In the Division combo box, select the division responsible for this transaction if your company allocates per division.
- In the Department combo box, select the name of the department related to this stock receipt transaction if your company allocates per department.
- In the Project combo box, select the project related to the relevant transaction

After completing these data, the system will automatically display the product that you have taken from the previous PL transaction.
- Product, contains the name of the product that has been selected
- Warehouse, contains information about the warehouse where the goods are placed
- Owner, shows the owner of the goods (consignment) received by the company
- Lot, contains lot number information
- Quantity, contains the quantity of products received. Make changes if necessary
- Price, type the price information if necessary
- Chart of Account, contains CoA mapping information that will be used as an automatic journal by the system
- Division, Department, and Project, contains cost centre information from the related product
- Note, create more detailed and specific notes on the Note facility for each product you order.
When finished, click the Save button at the top of the transaction to save the data
On the navigation button above the transaction, make the necessary transaction status changes. The options provided by the system are:
- Entry, still in the process of registering SR form transaction data into the system. In this status, data can still be edited and deleted.
- Confirm, the transaction data is confirmed to the system but has not yet been posted. In this status, data cannot be edited unless the Confirm status is first changed to the Revise status.
- Running, the transaction data is posted into the system. This status is run after the Confirm status, if you do not use the Running status then you will not increase stock in the warehouse. Just like the Confirm status, to edit the Running status data, it must first be changed to the Revise status.
- Revise, this status is used only to edit data but cannot delete/eliminate (all) transaction data on this form.
- Pending, the transaction form is temporarily closed with the intention of delaying. This status can still be opened to continue again.
- Cancel, the transaction form is cancelled and cannot be reopened.
- Close, all transaction forms are closed and cannot be reopened.
Change the Entry status to Confirm, then Running to post the transaction
To display the transaction document, click the Preview button